Easy Bag Lining Tutorial for Beginners and Pros.
I love crafting and remember my excitement when I started making my own bags. The feeling of pride was big. But, when I learned to add a lining, my bags became even better. Bag lining makes DIY totes and purses look great and last longer.
Are you new to sewing or already experienced? This bag lining tutorial is for you. It covers picking the right fabric lining and adding it perfectly. With this guide, you’ll be ready for any DIY bag or handmade tote project. You’ll make bags that are both beautiful and durable.
Lining bags changes everything, and I’m excited to help you. Together, we’ll explore purse construction, sewing tutorials, and bag making guides secrets. You’re about to transform your craft projects. Learn how to sew a bag lining that shows off your style.
Key Takeaways
- Comprehensive guide on lining handmade bags for beginners and pros
- Essential techniques for creating a professional-looking, durable bag lining
- Step-by-step instructions on selecting the right lining materials and attaching the lining to your bag
- Unlock the full potential of your DIY bag projects with polished, long-lasting results
- Elevate your handmade totes, purses, and more with custom, personalized linings
Mastering the Art of Lining Your Handmade Bags
Lining a handmade bag makes it look better and last longer. It’s useful for projects like totes and purses. A lining adds strength and a neat finish. This guide will help you line your handmade bags perfectly, making them both pretty and durable.
The right lining techniques can make your bag guides seem expertly done. This involves picking the best fabric lining and sewing carefully. You’ll learn to make your diy bags stand out with these tips.
If you’re just starting or already know how to sew, learning about bag lining is key. This guide shows you step by step. You can do even the hardest lining techniques with ease after this.
Get ready to start something new with these craft projects. This detailed guide will help you make handmade bags that are both beautiful and resilient.
Types of Bag Lining Materials
When making your bags, you can pick from many fabrics for the lining. Cotton fabrics are loved for their breathability and comfort. But synthetic fibers like polyester or nylon are tougher. They can handle more use. The lining material choice depends on how you’ll use the bag. Also, it’s about the look you want and how well it lets air pass through.
Picking the best bag lining materials means thinking about the good and bad of each. Cotton fabrics feel soft and natural. They let air flow, which is great for bags that stick close to you. However, synthetic fibers beat them for durability. They withstand use, spills, and the weather better. Your choice should match your bag design and what you personally like.
Cotton Fabrics for a Breathable Lining
Cotton is a top choice as a fabric lining. It breathes well and is comfy, keeping heat and moisture down. This makes it perfect for totes, purses, and similar bags you keep close.
Synthetic Fibers for Durability
Synthetic fibers are known for being long-lasting and tough. Materials like polyester or nylon don’t wear out easily. They are a smart pick for bags that get used a lot or face tough conditions. They might not breathe as well as cotton, but they make your bag strong and reliable.
Which bag lining materials are right for you? It all depends on what your bag needs. Look at the good and bad of each fabric to choose the best lining. This way, you get the right look and function for your bag.
Prepping Your Bag for Lining
First, you need to get your bag ready for the lining. Gather all the tools and supplies needed. Start by measuring the interior of your bag. This will tell you what size of lining fabric to cut.
Measuring and Cutting the Lining Fabric
Measure the inside of your bag carefully, for its length, width, and depth. Also, measure its widest and deepest parts. This ensures the best fit for your lining fabric. After measuring, add a bit extra to each size for seams and tweaks. Doing this helps you cut the lining fabric just right for your bag.
Gathering Necessary Tools and Supplies
Now, besides the lining fabric, get key sewing supplies ready. You’ll need a sewing needle, thread, pins, scissors, and any other item specific to your sewing job. Ready your bag and have the right items. This makes the process smooth and successful.
Sewing Basics: Stitching the Lining
Learning to sew the lining of your bag well is key. You can do it by hand or with a sewing machine. Knowing how to do it right means your lining will look neat and stay in place. We will teach the basics of stitching the lining. It’s all about getting those even stitches right to make a perfect lining.
Good even stitches make a big difference in your bag lining. Make sure your rhythm and tension are the same while stitching the lining. Use backstitching at the start and end of each stitch to make it stronger and stop it from coming out.
To make your lining look pro, hide your stitches. Sew just inside the seam allowance. This way, the stitches won’t show on the outside of the bag. Try different stitches like straight stitch or zigzag stitch. See which ones work best for your sewing project and fabric.
Knowing how to sew your lining well makes your handmade bags stand out. Perfecting your stitching takes practice and paying close attention. This way, your stitched lining will look great and last long. It really improves the whole look of your sewing creations.

Creating Sturdy Bag Lining
It’s important to make a bag lining that is tough and long-lasting. You can do this by strengthening the corners and edges of the fabric. Adding interfacing also helps. This makes the lining stable and gives your bag more support. Doing these things improves both the look and the life of your bag.
Reinforcing Corners and Edges
Strengthening the corners and edges is a crucial step. It stops the lining from wearing out too soon. Your bag will keep its shape and last for years. By taking care to do this, you make a bag that stays in great shape, even with lots of use.
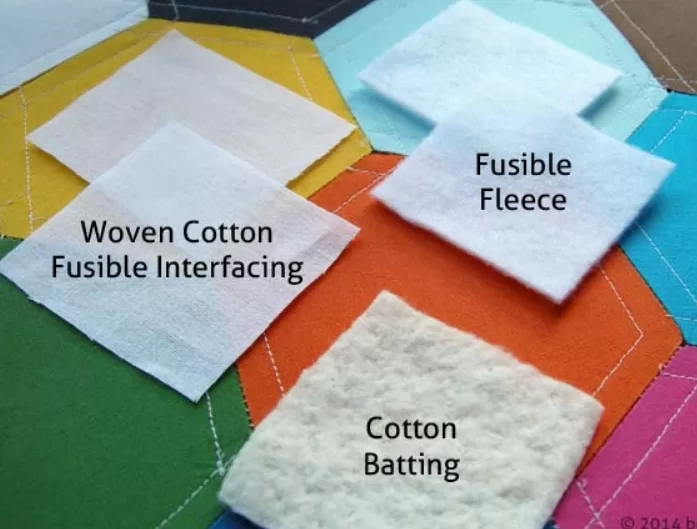
Stabilizing the Lining with Interfacing
Using interfacing is key to making your bag lining sturdy. It adds structure and support. This stops the lining from getting lumpy or baggy with time. Picking the right interfacing and using it well makes your bag look professional and last a long time.
bag lining tutorial
This tutorial is for all, whether you’re starting or skilled in sewing. You’ll get detailed steps on creating bags with top-notch linings. Feel confident making bags that look pro and are fully lined.
Step-by-Step Instructions for Beginners
If you’re just starting with bag lining, this guide is perfect. It walks you through every step clearly. You’ll go from cutting the fabric to sewing it perfectly inside your bags.
Pro Tips for Advanced Lining Techniques
Already know your way around a sewing machine? This tutorial has something for you too. You’ll get expert advice like reinforcing corners and adding zippered pockets. These tips will make your bag linings stand out.

Adding Pockets and Compartments
Upgrade your bag by adding pockets. These not only provide extra space but also let you organize your things your way. You can make your bag suit your needs better.
Zippered Pockets for Secure Storage
Zippered pockets keep your things safe. They’re perfect for your phone, keys, and more. With them, your bag stays neat and secure.
Slip Pockets for Quick Access
Slip pockets are open and make getting things easy. You can use them for items like a wallet, sunglasses, or a notebook. They help keep your bag neat and you ready for anything.
This guide will show you how to add zippered and slip pockets. By doing this, your bag won’t just look good, it will work better for you. It’s a stylish way to have everything in its place.
Attaching the Lining to Your Bag
The last step in making your bag look great is putting the lining in. You can do this by hand-sewing or machine sewing, depending on what feels right for you. Also, think about what your project needs.
Hand-Sewing vs. Machine Sewing
If you choose hand-sewing, grab a strong needle and thread. Carefully sew the lining into the bag. This way gives you a lot of control and is perfect for fancy or detailed bags. Machine sewing might be quicker, especially for big or simpler bags. Whichever method you go for, make sure your stitches are strong and evenly done.
Finishing Touches for a Professional Look
After sewing in the lining, add those finishing touches for a pro look. You might do topstitching, add extra stitching or decorations, or cut off any spare fabric neatly. Using these professional bag construction tips makes your bag not only work well but also look expertly made and high quality.
Caring for Your Lined Bag
Looking after your handmade, lined bag takes a little more effort. Just follow some easy steps. This will keep your favorite bag in great shape for a long time.
Cleaning and Maintaining the Lining
It’s important to keep the bag’s lining clean for it to last longer. To clean the lining, start by dealing with any stains. Use a mild fabric cleaner. Don’t use anything too strong or scrub too hard. This could harm the fabric.
If the lining needs a deep clean, you can hand-wash it. Use mild soap and cold water. Handle it gently and let it air-dry to avoid damage.
To keep the lining in good shape, dust it off regularly. Also, wiping it with a soft, dry cloth helps. Doing these simple tasks ensures your bag’s lining looks new for longer.
Extending the Life of Your Handmade Bag
There are more ways to keep your bag going strong. First, store it in a cool, dry place. Sunlight can make the colors fade.
Try not to put too much in your bag. Overloading it can harm the lining and the outside. Also, handle it with care.
An organizer can help keep your bag in shape. It protects the lining too. With proper care, your bag will stay beautiful for years.
Conclusion
In this detailed bag lining tutorial, you’ve learned key skills to make your bags stand out. Now you know how to pick the best materials, attach the lining, and add pockets. These skills will help you make professional-quality bag-making projects.
This guide is great for both new and experienced sewers. You’ve gained the confidence to line your handmade bags easily. Be sure to use these lining techniques in your work. You’ll love the functional and beautiful handmade bags you can create.
By knowing how to line bags, you’ve taken your sewing projects and DIY crafts further. The knowledge from this guide empowers you. You can now make handmade bags that are not just pretty but also durable. Enjoy your new skills and keep exploring bag construction and sewing guides.